
Context
This week, i focused on finishing the edit on multiple video shots together to create one complete video, demonstrating correct use of framing, lighting, audio, and scene selection. The brief was designed to help us understand how different shots work together in post-production and how editing decisions affect the final outcome.
My target audience for this project was teenagers, as the content and pacing were kept simple, clear, and visually engaging. Research into youth video consumption shows that teenagers engage best with videos that are fast-paced, visually clear, easy to follow, short and structured.
Because of this, I made editing choices that prioritised clarity, smooth transitions, and consistent visual quality. The final video consists of eight different shots, which I edited together using Adobe Premiere Pro. The completed video was then uploaded to YouTube, making it accessible on a platform commonly used by this age group.
Research
Technical
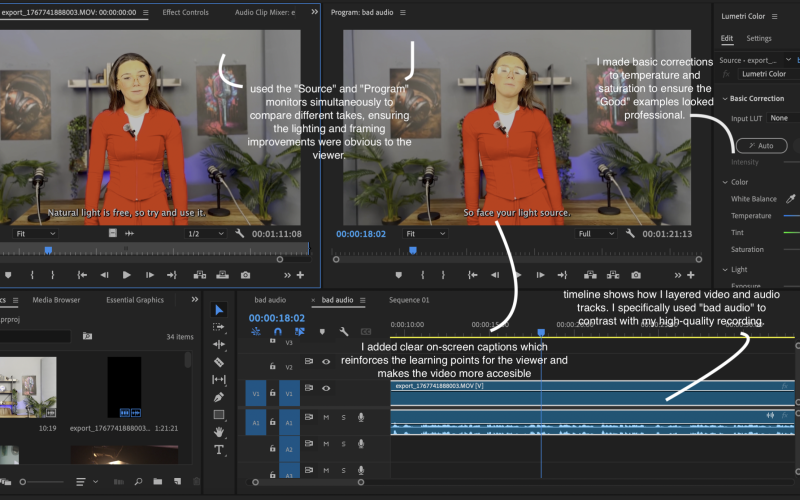
For this project, I used Adobe Premiere Pro as my main editing software. I chose Premiere Pro because it allows me to easily cut and arrange clips, sync audio, adjust colour and exposure colour.
An alternative would have been software like iMovie or CapCut, which are easier for beginners. However, Premiere Pro is more suitable for developing professional editing skills because it offers advanced tools such as colour correction, audio mixing, and timeline control.
I researched how professional editors assemble multi-shot videos by using:
- Adobe Premiere Pro user guides
- beginner-to-intermediate editing tutorials
- workflow examples for assembling sequences
Story
Rather than filming new content, my focus was on how editing choices can shape meaning and flow.
The first thing I did when I started editing was clearly reviewing all eight shots, selecting the strongest takes, and then ordering clips so visuals made sense. I also cut out any unnecessary footage and ensured my audio and visuals matched clearly.
I looked at how short-form educational and teen-focused videos are structured, noticing that they often rely on clear sequencing rather than difficult storytelling. I adapted this approach by keeping the edit simple and logical, removing any clips that felt confusing or repetitive.
I took my main inspiration from this video:
Style
Stylistically, I aimed for a clean and simple look, suitable for a teenage audience. I avoided heavy effects and instead focused on smooth cuts and clear audio.
The style was inspired by YouTube educational videos aimed at teen viewers, where the focus is on learning rather than visual overload. Because this video was platformed on YouTube, I kept pacing tight and made sure each shot stayed on screen long enough to be understood.
Practical Skills
This week, my main practical focus was editing so i:
- Imported and organised all video clips in Premiere Pro
- Reviewed footage and selected the strongest shots
- Cut clips to improve pacing and clarity
- Adjusted exposure and framing where needed
- Arranged shots into a logical order
- Uploaded the video to YouTube with a title and description
Evaluation and Reflection
What Went Well
- I successfully combined all the different shots into one clear, structured video.
- This project helped me feel more confident using Premiere Pro to manage multiple clips.
- The final video was easy to follow and suitable for a teenage audience.
Even Better If
- Adding subtle transitions could improve flow without distracting the viewer.
- Further refining audio levels would make the video sound more professional.
- Spending more time matching colour across shots could improve visual consistency.
Leave a Reply